Frosthaven Is Great!
Because spoilers are a concern in a game like this, you can feel free to read this up until the SPOILER section, to see if you're interested."Standard" Campaigns
I've really been enjoying Gloomhaven these past years, including digital, which is an entirely new experience in a lot of ways. Highly recommended. But now we have the release of Frosthaven, and I have been quite actively playing this in a number of modes:1) Two player with a friend (+0 or +1 difficulty)
2) Four player, with a group of friends (+0 or +1 difficulty)
3) Three player, solo (+2(.5) difficulty)
Advanced/Difficult Campaigns
I've had quite a lot of fun with these modes, about 8-12 scenarios in on each of these, but I have also played a few different variants for my own amusement.
I have beat several scenarios on "easy" (-1 difficulty) in a two player party, using just default actions (move 2, attack 2) on both characters. This is certainly difficult, but since the only thing that matters about your card is the initiative number, and you will be level 1 ~forever, this "difficult" mode might not have a lot of replayability. And some scenarios (anything with shield, anything with a movement requirement) are difficult if not impossible.
True Solo Mode
The advanced difficulty mode we are going to discuss here is playing the 2 player setup, with just a single character. I chose the drifter, because I like the drifter, and they are well suited to this experiment. The drifter is basically two default actions stuck together, so it made sense. I did the first few scenarios on "normal" difficulty (I assumed this would be better than two characters with default actions, and I already had success at -1 there), but have been mostly playing on +1 since then. I have victories on 7 of the scenarios so far, most improbably perhaps scenario 16, and the only ones I consider ~impossible before this were 22 and 114. Here we will be discussing scenario 26.
======================CONTENT TO BE SPOILED========================
Scenario 26, the monsters, events, etc.
Drifter level 5 abilities, perks.
Craftsman level 3 items. (Items 1-20, the max for prosperity 2) (and the gold-purchased starting items)
Random item 188 (which I thought was garbage when I first saw it)
Unlockable items 84, 92 (though these are not critical)
======================ACTUAL SPOILERS========================
======================ACTUAL SPOILERS========================
======================ACTUAL SPOILERS========================
======================ACTUAL SPOILERS========================
======================ACTUAL SPOILERS========================
======================ACTUAL SPOILERS========================
======================ACTUAL SPOILERS========================
Difficulty
+1: Much too hard
I attempted this scenario with the solo drifter a good dozen times at +1 difficulty ((avg level = 5, +1 for solo)/2 + 1 = 4). The scenario was borderline impossible (certainly insanely difficult). The closest I got at +1 was a Steel Automaton with 5 health, and two Ancient Artillery left to kill when I exhausted. This may sound "close", since I had defeated 7.8 of the 10 monsters, but it was impossibly far away from victory. I would have needed 2-4 more cards, 3 rests from the end to have a reasonable chance at victory. The CR 4 scenario has around 150 health worth of monsters in it (with some caveats on that), AND time pressure, AND multiple sources of CC. If you presume you'll do 5 damage a round with the drifter (not bad), this means 30 rounds. If you presume 6 damage a round, it would be 25 rounds of activity. A ~10 card class (two losses) like the drifter has ~26 rounds of activity if you never lose a card to damage. The Ruined Machines attack 3, the Artillery attack 3, the Automaton attack 4, and you have 18 health. So you're likely to lose a card here or there whatever you do. So it is hard to imagine how you'll be able to defeat this even if the time pressure was not on in this scenario.
+0: Not much easier
I tried it a few more times at +0 (CR3), and I wasn't having much more luck. I did get down to just the last artillery (two moves away from engaging it), which was still miles away from true success (at least 3 more actions). The change from 4 to 3 was significant for the damage you had to do (~32 less), but the time pressure is truly insane. If you could hold back, fight the monsters as they lumber towards you, I have no doubt I could beat this at +0, but the scenario requirements do not allow this.
This is the story of my first attempt at -1 (CR 2)
-1: What we discuss here
So, I broke down and went down to "only" easy difficulty (CR 2). The changes here were not so large in health (-12 total), and no movement changes occurred, but the monsters did -1 damage across the board. So I still had to do almost as much damage as I would have at +0, but the incoming damage should be greatly reduced.This is the story of my first attempt at -1 (CR 2)
Character Setup:
Since I am playing in no less than ~5 variations of campaigns simultaneously, I have had to make some sacrifices for my solo endeavors. The only components I truly dislike in Frosthaven are the attack modifier cards. They are difficult to shuffle, easily damaged, etc. To improve on this, I use magic card sleeves, with a card inserted for stiffness, and a hand-drawn proxy for the attack modifiers.
For the cards and items, I have relatively simple hand-drawn items that are easy to store, reduce table presence, and so on.
For the cards and items, I have relatively simple hand-drawn items that are easy to store, reduce table presence, and so on.

The biggest non-inclusions I would argue for strongly for this scenario are:

The level 3 card, Fierce Barrage
This card is amazing, and one of the ways you can average more than 4 damage a round. But in this scenario, it is very difficult to get this template to work. The positioning of the artillery makes them immune to being included, unless they are pushed or pulled (I have zero push or pull), the Machines don't naturally stand adjacent, and your positioning is often required to be otherwise to not lose. And doing an "extra" 4 damage (into 2 shields) on the Automotons, if you could somehow have time to attack them, or have them be nearby when you are attacking a machine, is... not that great.

A level 1 "pierce" card, Fortitude
The Steel Automatons are no joke at any CR. They have 2 shields, tons of health (12-17 across difficulty 2, 3, 4), and you must kill them to win the scenario. Also, a ranged attack is welcome in a scenario with immobilize. However, with the requirements of the scenario, I did better without this card than with it. You don't really attack the Automatons early, the priority targets don't have shields, and it is very easy to run out of charges on this scenario, because of all the factors disallowing long rests (amazing for the drifter, a long rest is ~9 health, a jump (no natural jump, and very important for the scenario), and so on.
Items
Up until now, I have been bringing the reinforced shield (tap to prevent a condition - superb) and a poisoned dagger (tap for poison). Poison would normally be excellent against high hit point shielded targets, or targets that have to die (the Ruined Machines), but both of these are immune to poison. I instead brought the Heavy Sword (Tap for +1 damage) and I believe it is just better than the poison dagger for most purposes.
The drifter does damage in big chunks. The drifter is often making an attack that is likely to kill the target without a -2 or miss, and if you can eliminate -1s as well, that's great. The dagger gives you the damage on the next turn. Dagger will still potentially be swapped in for high hit point single target scenarios, but for now it's on the bench.
Jump boots are essential for the class. Enough said.
Random Item 188 is extremely good in the scenario, and I am glad I failed scenario 16 the first few times so I would take a second look at some of the items I'd initially dismissed, like this one. When your goal is to hide in a corner and melee a bunch of guys down, getting some incidental damage is great. When monster pathing is a big deal (like it is in this scenario), it can give you an extra turn to not just lose, which is "somewhat important". It also slows the Automatons down, but this can sometimes be disadvantageous since they might try to path through a hex where you automatically lose.... Have I mentioned that there is a lot to worry about in this scenario?
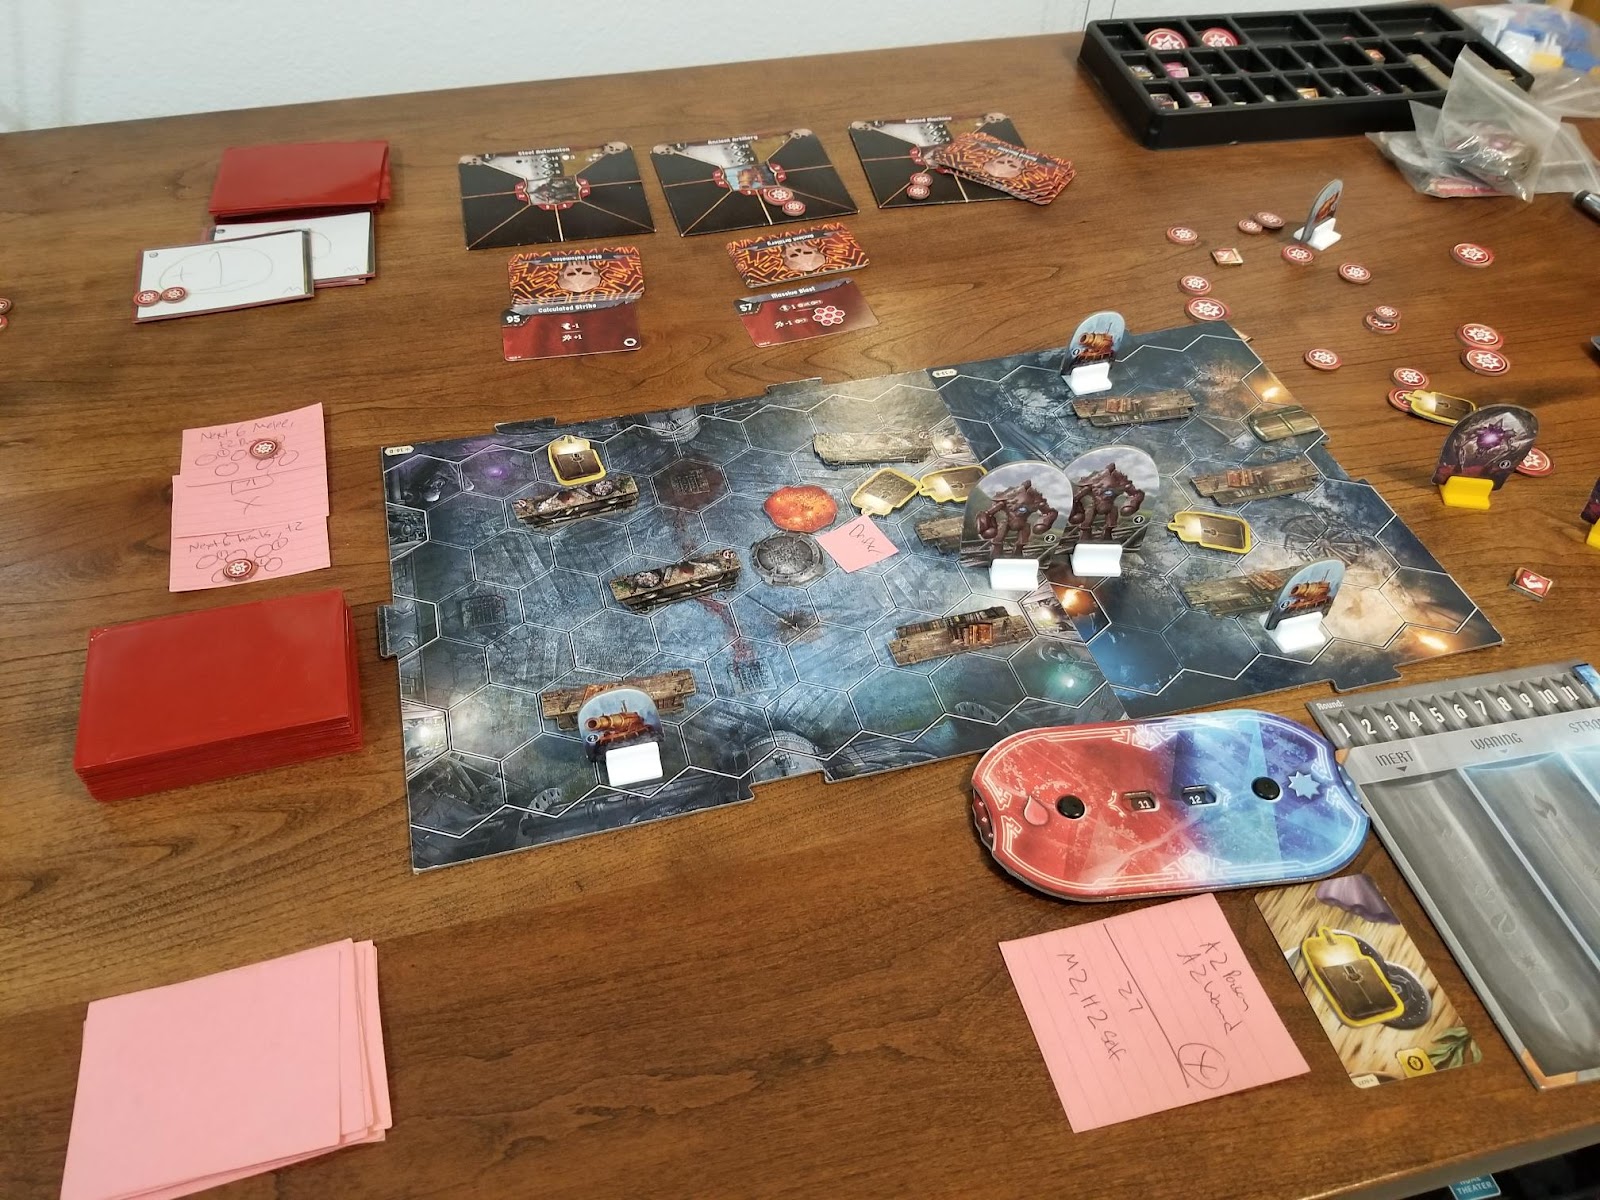
 I am a big proponent of not doing the double loss on the drifter R1Action1. You don't need the healing buff to be active action 1 or 2 typically. This is a scenario where movement is an extreme priority. It's a little silly to stand still out of the gates. But there are a couple reasons I default to this strategy for THIS scenario, when I might not do it in a "typical" scenario.
First, if you move forward, all you do is get in range of the Automatons , or more cannons. Doing that when you can take no action is not amazing.
Second, if you move next to a cannon, they have a fair number of abilities that push you away, and then you have to use ANOTHER move to get back into range. I am buying the crude spear and taking the 3rd hand perk to keep the shield after this scenario. This is a disaster.
Third, you want to go slow anyway, but you can only go SO slow, and the golems can out-slow almost anyone.
Fourth, the further the Automatons move this way, the more they have to move the other way once you start moving.
Fifth, I've found that you do typically have time to kill exactly one Artillery before engaging the Machines. No more than that, certainly. You could also use the time before you get in range of the Machines to get a wound up on a Automatons, but at high difficulty, they were still alive even with the wound by the time I died. You can often prevent the Automatons from swinging, but it is very difficult to prevent getting shot by two Artillery a round unless you kill one. Killing one dramatically increases your longevity, by limiting the spikiness of the damage into you. It also means that you might only get shot by one Artillery on the rounds they draw their immobilize, which means you can use your shield to keep your mobility. Normally you get shot by two, and your shield mocks you.
I might normally argue that you can just put the heal up "later", on some round you don't have to move, but there is no such round in this scenario. You need your bottoms to be shield 1, heal 4, attack 3, move, move, move, or you just lose. You also need to get the incidental healing from your rolling perks, items, and cards, to prevent losing a card (there is no long resting on +0, +1). I've made it all the way through the first 6 turns multiple times while having no time to put the heal up, so you might as well do it round one, since it has some benefits.
I put both Automatons on the same side, because it is very easy for them to be "forced" to path through the auto-lose hex if they are not on the same side of it as you.
A few notes on notation: I put damage counters on the attacks to make it clear how much damage I thought the attacks did to ME. I don't do this for my damage into the monster (why? who knows). This also makes it clear to me that I did one less damage per Artillery attack here than I thought I did, so my hit point total is -2 from here on (does not impact the result)
Round 2: Change of Plans
The drifter does damage in big chunks. The drifter is often making an attack that is likely to kill the target without a -2 or miss, and if you can eliminate -1s as well, that's great. The dagger gives you the damage on the next turn. Dagger will still potentially be swapped in for high hit point single target scenarios, but for now it's on the bench.
Jump boots are essential for the class. Enough said.
Random Item 188 is extremely good in the scenario, and I am glad I failed scenario 16 the first few times so I would take a second look at some of the items I'd initially dismissed, like this one. When your goal is to hide in a corner and melee a bunch of guys down, getting some incidental damage is great. When monster pathing is a big deal (like it is in this scenario), it can give you an extra turn to not just lose, which is "somewhat important". It also slows the Automatons down, but this can sometimes be disadvantageous since they might try to path through a hex where you automatically lose.... Have I mentioned that there is a lot to worry about in this scenario?
Round 1: (Prepare To) Fight!
First, if you move forward, all you do is get in range of the Automatons , or more cannons. Doing that when you can take no action is not amazing.
Second, if you move next to a cannon, they have a fair number of abilities that push you away, and then you have to use ANOTHER move to get back into range. I am buying the crude spear and taking the 3rd hand perk to keep the shield after this scenario. This is a disaster.
Third, you want to go slow anyway, but you can only go SO slow, and the golems can out-slow almost anyone.
Fourth, the further the Automatons move this way, the more they have to move the other way once you start moving.
Fifth, I've found that you do typically have time to kill exactly one Artillery before engaging the Machines. No more than that, certainly. You could also use the time before you get in range of the Machines to get a wound up on a Automatons, but at high difficulty, they were still alive even with the wound by the time I died. You can often prevent the Automatons from swinging, but it is very difficult to prevent getting shot by two Artillery a round unless you kill one. Killing one dramatically increases your longevity, by limiting the spikiness of the damage into you. It also means that you might only get shot by one Artillery on the rounds they draw their immobilize, which means you can use your shield to keep your mobility. Normally you get shot by two, and your shield mocks you.
I might normally argue that you can just put the heal up "later", on some round you don't have to move, but there is no such round in this scenario. You need your bottoms to be shield 1, heal 4, attack 3, move, move, move, or you just lose. You also need to get the incidental healing from your rolling perks, items, and cards, to prevent losing a card (there is no long resting on +0, +1). I've made it all the way through the first 6 turns multiple times while having no time to put the heal up, so you might as well do it round one, since it has some benefits.
I put both Automatons on the same side, because it is very easy for them to be "forced" to path through the auto-lose hex if they are not on the same side of it as you.
A few notes on notation: I put damage counters on the attacks to make it clear how much damage I thought the attacks did to ME. I don't do this for my damage into the monster (why? who knows). This also makes it clear to me that I did one less damage per Artillery attack here than I thought I did, so my hit point total is -2 from here on (does not impact the result)
Round 2: Change of Plans
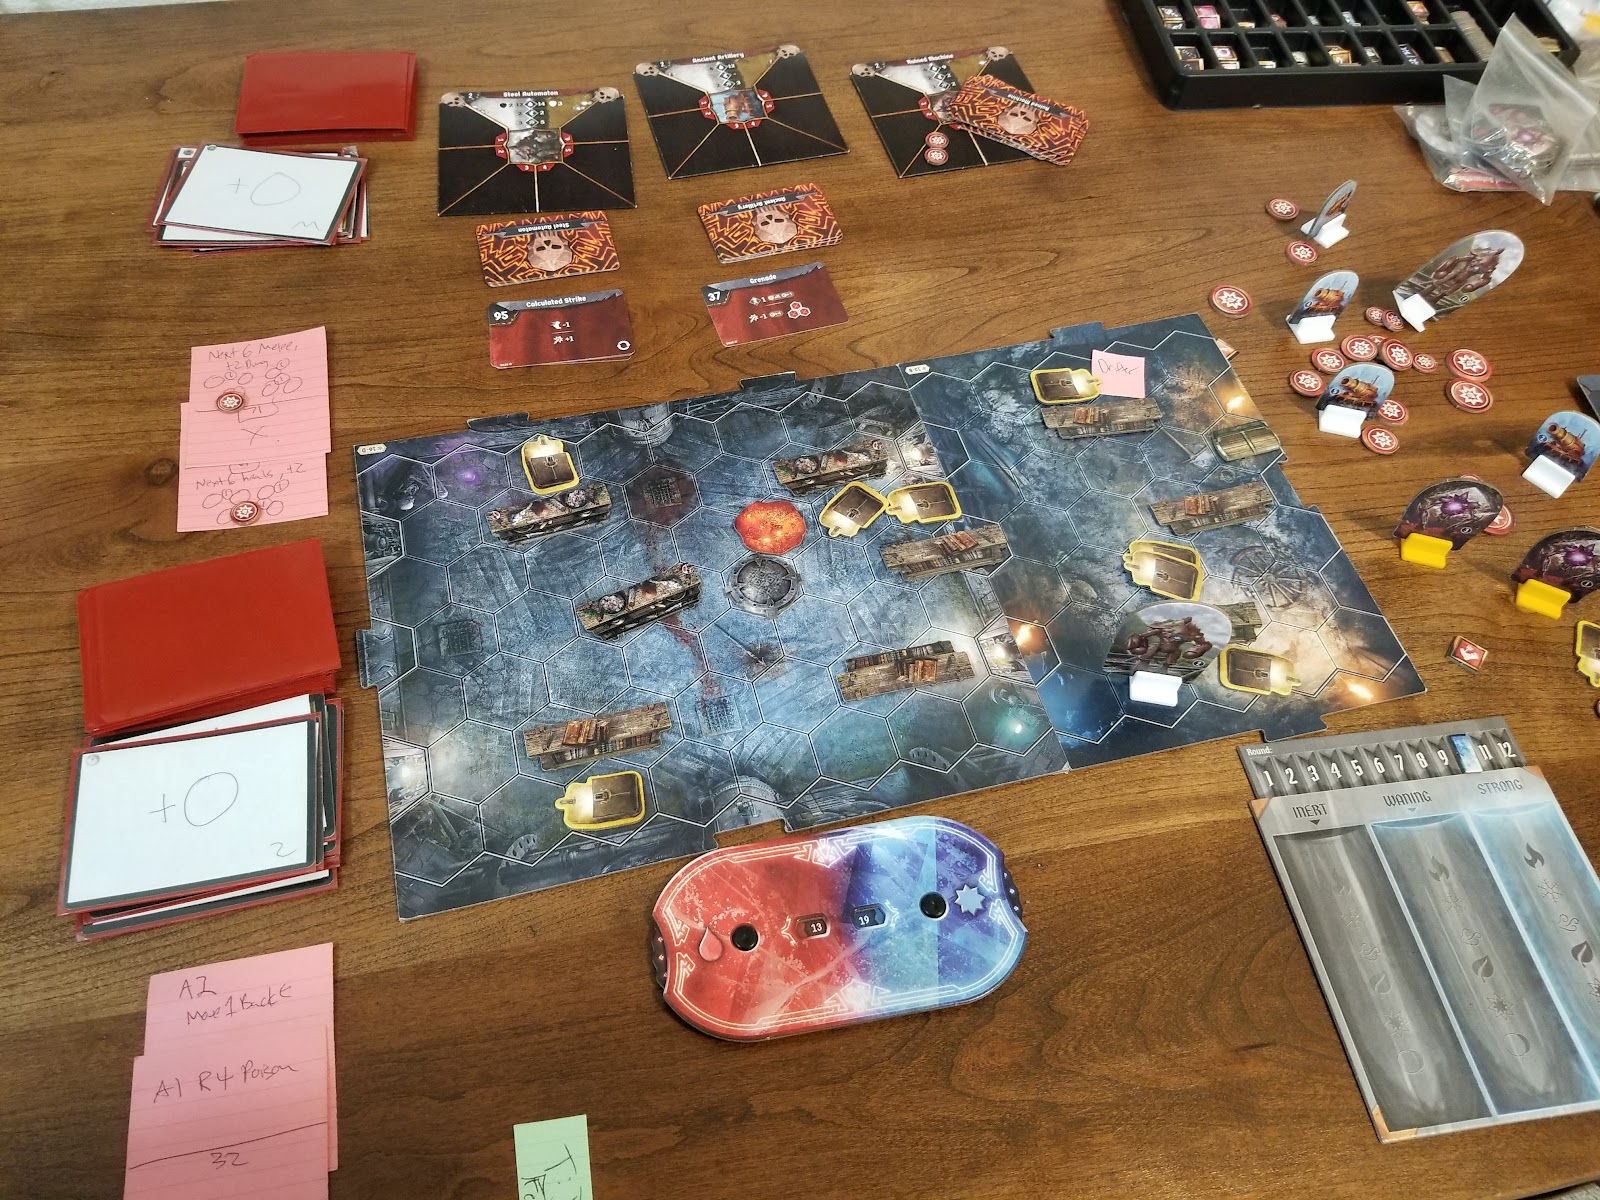
 My plan here was to charge forward, ignoring the (2 damage on -1 difficulty) artillery, and just making sure I didn't lose to the machines. It is very easy to lose to the machines.
2 move gets me in range of the nearest Automaton, the healing tops me off (or so I thought, ha), and I could get a wound down on one of the Automatons and let that tick while I jumped over them the next turn and made for the Machines.
But then the Automatons drew "move 3 attack 2 push 3". Often this causes only one of them to be able to attack, so it can be a benefit, but in this circumstance, I could not find a way for them to not destroy me with the push. After considering for a while, I changed my plan to killing an artillery. Killing an artillery is still good, for the reasons I call out above. I also used my sword here, because 4 (card) + 2 (crushing weight) + 1 (sword) + 1 (wound) is the 8 damage it takes to kill an Artillery THIS round, but critically, AFTER the Automatons go. This leaves me free to move on the next turn (at any initiative) without having to use a jump. I draw a +0 (10 of these in the deck) and not a +1 (4 of these) and the plan works. A heavy sword activation is way less important than a jump in this scenario, so I'm ahead in my book. (and the Automatons went the long way around)
Also, this new plan puts me out of range of everything, so I take no damage this round. Important for not losing cards. I still have the damage on the cards, even though I took no attacks this round, something I'll try to fix in the future. Still overestimating my health by 2
Round 3: Fortune
 I had a plan if the machines moved 2 this round, and I might have just lost if they moved 3. Drawing their one move zero is fortunate here, but if it came any time in the first couple rounds I'd be in a similar spot.
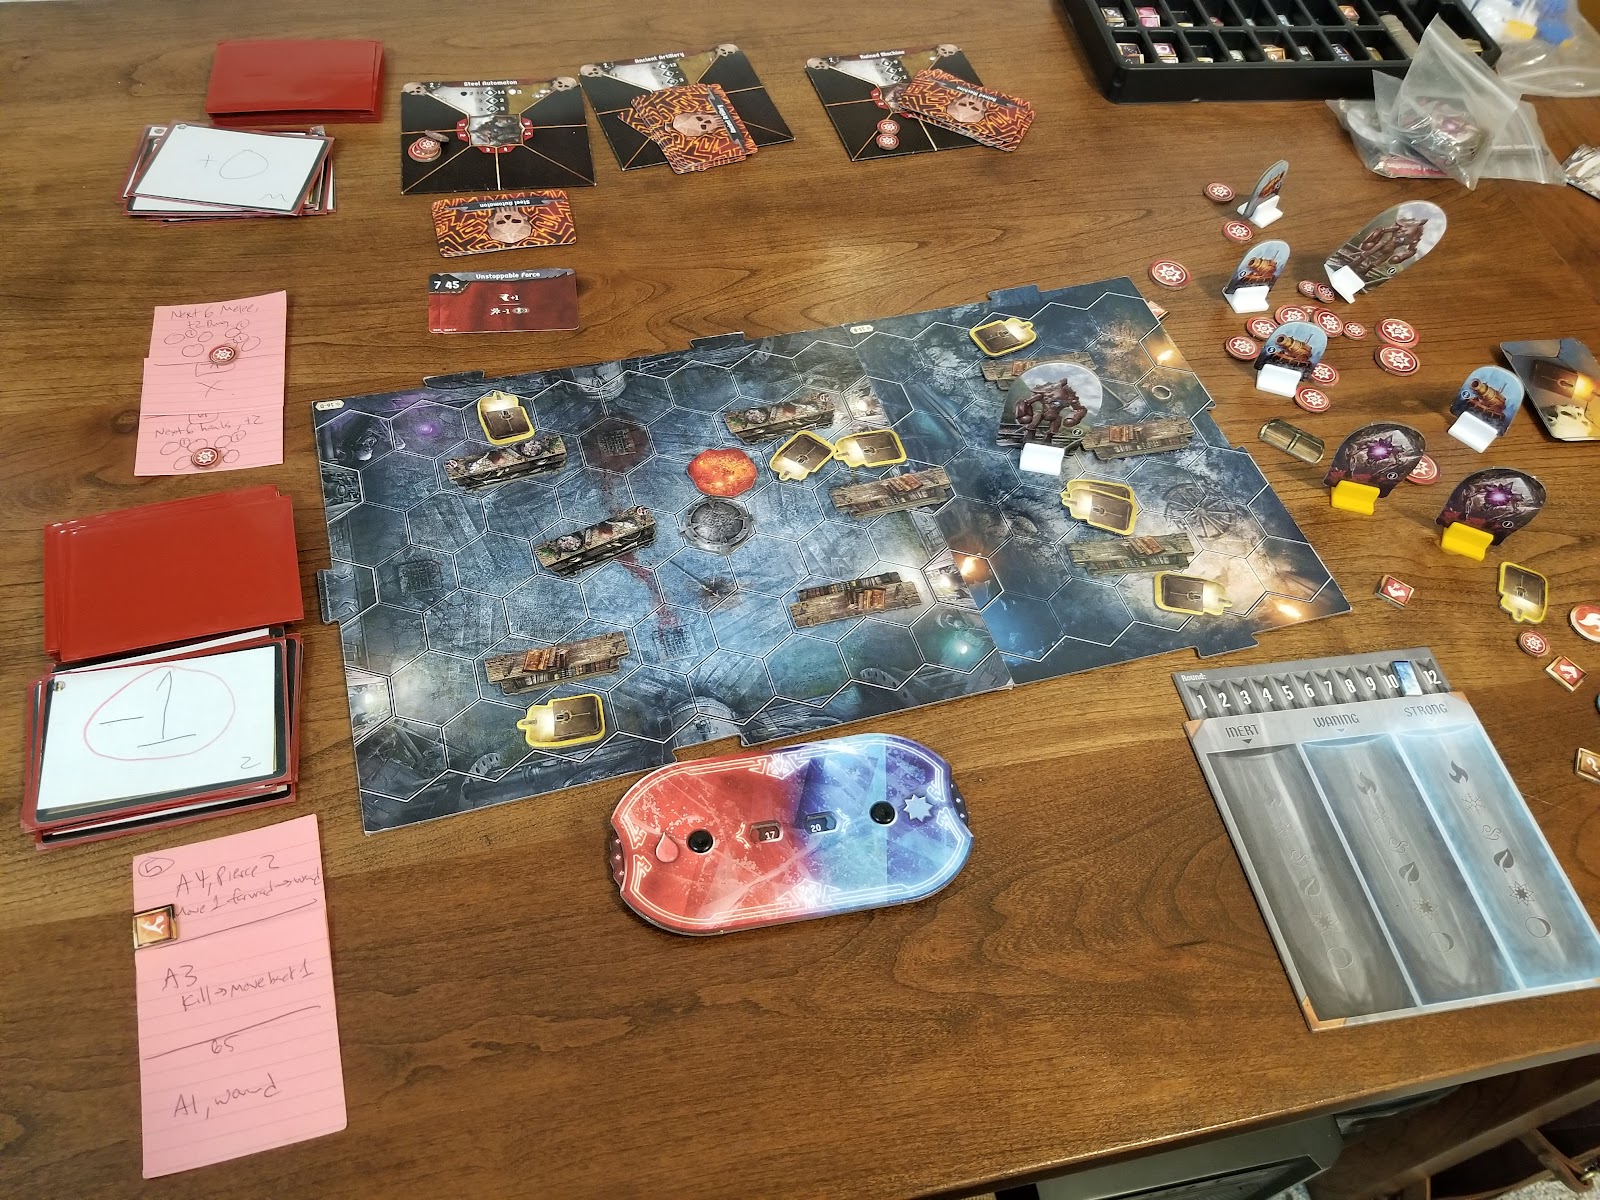
I planned to not really be in range of anything, so I went super slow, recovered some charges, and hoped the Automatons would be stuck in the corner forever if they moved before me (which does look quite likely right now, but just wait....) If I had been pushed in range of a Machine, I'd have punched instead of doing the double move back, but I did not "waste" the attack 4 on the Automatons, when I could recover two full charges (with experience! (Experience doesn't matter in this scenario))
Charges matter in this scenario, and since I couldn't put up a wound, it made sense to play it a bit slow while I could.
Round 4: Cut Off
 Realistically, one of the key aspects of this scenario is you need to find a way to force the Machines to move further than they might normally. This is enabled by the heavy presence of obstacles here, to drive them into "lanes" and hopefully cut them off. Unfortunately, it is quite difficult for them to actually move into the lanes due the way their focus works, so often the "backtracking" is minimal. Item 188 is a very important item for this specific challenge. Without it I think this scenario might be impossible at any difficulty (for True Solo).
 You drop a hazardous terrain, which makes the monster find another path. You get another couple turns (sometimes just one) to try and kill it, and that is just what you need here. I thought this item was garbage when I first saw it, because really, it doesn't matter much for multiplayer. How much can this really matter? Well, it is a kind of extra player standing in the way here, so that's critical. Is also pretty good when you're hiding in the corner and the melee monsters can't get to you without stepping on it, AND you're playing on +1 for some reason, for 3 damage!)
It didn't matter if the machines moved two or three here. If they moved three I got to attack them. If they moved two, I got to drop the terrain inside the "lane", so I wouldn't have to stand in the center to "double block" it. They likely had several more +1s than +0's in their deck at this point. Move 3 was probably "better" for me. And no, dropping the terrain on the monster does not do damage (they have to enter the hex, the hex entering them doesn't trigger it, ha!), and if you put the hazard on them, they happily keep moving towards the loss condition, so at a certain point, it becomes too late to stop them.
I attacked the Machine NOT stuck in the "lane", which is critical, but not terribly difficult to figure out.
I drew my one immobilize card in my attack deck, which made the next turn very easy. But even if I had not drawn that, I think I would have been fine. Simply go fast, hit the one that was not "stuck" (before they can move) and the "stuck" machine would go backwards. Ideally after I wounded them or something.
I did go as slow as possible, because whatever the machines did, I was ~safe. I did want to land a hit on them if I could (and not the other way around). I have had them double explode in this situation, but that is kind of a good news/bad news result. On +1, you take 3 + 3 + 6 + 6 = 18 on average, and then the Artillery shoot you.
The cherry on top here was that the Automatons got "stuck" on each other. Which is brilliant until you realize they acted AFTER me, so they should have gone the other way. Another minor mistake here. Maybe impactful, but it just would have caused me to do the same thing I did a few rounds later.
Round 5: Machines under control
 I think if I was under pressure from the Automatons here, I would have went very slow (I did hit the immobilize after all, and my health is very high), killed the Automaton, and jumped to the other side of the table somewhere, to force the Automatons to path around that way, instead of where they are right now. This would avoid the instant-loss threat but would also make killing the Machine more "exciting." I just didn't worry about them, because in my mind, they were already out of the action. It was only on the next turn that I thought they might do something unfortunate. Just another wrinkle of difficulty in this scenario...
We do see a bit of tracking wonkiness in R5 for the Automaton health, bit it is corrected in R6. The muddle symbol is my way I note I messed something up =)
Round 6: Automatons don't trigger the auto-loss...
 Thankfully, the Automatons did not move 2, which is probably a ~50% chance. I believe my bottom here is the 17 move 3 shield 1, so if they had moved, I would have jumped over the machine, and hit it (for the first time), causing the golems to path around the top, then hoped to kill it (perhaps stepping in the hazardous terrain, to not force the Automatons to path around it into the auto-loss) the next turn. I had options, but luckily, I didn't need them.
I drew a +3 as well, which instantly killed the second Machine (between this and its self-damage). Lucky again, but I didn't really need that luck here. I can make a 2nd attack into the Machine the next round and all it costs me is some irrelevant top right Artillery damage.
Additionally, it appears that even though I was at full health and full charges of persistent abilities, I used the heal portion of my level 4 card (it is optional). I also did NOT use the move back 1 portion. I am officially clear of the -2 health problem from earlier, and now I'm owed 2(!) charges. Let it never be said that I only make mistakes in my favor, ha!
Round 7: SHORT Rest
 I've tempted fate enough, there's no way those Automatons aren't going to draw a +0 or better move and end the scenario for me. I short rest. A long rest is crazily good for the drifter, but it's just too risky here.
Really, I probably should have just jumped past the machine last turn, which would have set me up to just rest for this turn, but mistakes happen. I go as fast as I can, which means I can't attack the Ruined Machines. I also have to get to the top wall of the map, so the Steel Automatons go that way. Not a super strong use of resources, but a necessary one.
Round 8: Exploiting monster movement
 I moved where I did, for the explicit reason that I wanted to take only one Automaton attack and be in melee with the Ruined Machine for the next turn in case I missed, even if it meant I took an attack from it.
My hope was that I'd put it on low health, and it'd die on its own (I am doing attack 6 wound for an extra charge), but I drew a crit. The Ruined Machine that was left also could only move one. It muddled me for the next round, but I'm okay with that because the next round is "safe" (I can't straight up lose no matter what the Machines do)
Round 9: Hit and Run
 My plan here was to be in position to move fast and plug the hole, whatever the Ruined Machine did this turn. It moved +1, which was about as good as anything.
I put a muddled attack into the Automaton, drawing +1 first, and not getting the heal due to the way disadvantage works. Then I just moved away. The Golems couldn't swing due to the -1 move, and I am set up to go fast and plug the hole so the Ruined Machine has to run away again next round.
I'm not sure why I moved as far as I did, that seems like a move 3. I rotated the healing card because I did not use the heal, but it looks like I should have taken an attack 4 that I did not. I am at 15 health, so this is probably irrelevant, but it's a mistake.
We also see me using a stamina potion here, just to guarantee not losing. This is probably the last turn I need to be specifically fast, so let's make it happen. It also gets me to even, so that's something. P.S. Love the new stamina potions, the restriction is great, 1 card is fine. Old stamina potions were too degenerate.
Round 10: No more auto loss
 Another mostly irrelevant crit here. I intentionally skipped the healing on this top action, just because the only thing I was weak on was charges, and I did not want a random rolling heal to destroy my healing buff.
If you are worried about the attack 4 I didn't take from the previous round, it probably wouldn't affect much. I did get immobilized, but took only one damage from 3 shots, whereas at +0 I would have taken 4 damage here. That level really added up to me not being in danger health-wise, which meant I did not need to lose cards to damage.
If I had not gotten lucky with the crit, I'd have done much the same thing here (maybe rested instead), then just chased down the machine and started with the top right Artillery, instead of the bottom left I will go after in a few turns.
Round 11: Come at me Automatons.... Or not, ouch...
 I went as slow as I could, took the move back 2, which I needed (plenty of room if I had to heal the previous turn), and hoped I could get a wound starting to roll on a Automaton. Instead, they drew their ranged attack, and I took a bunch of attacks this turn. Just barely broke into single digits though.
Round 12: A good time for a rest.
 The Automatons were move 2 and 3 away from me, only one Artillery is in conventional range, and I'm at 9 hp, so this seems like a good time to long rest. (+~9 effective health). The Artillery are stuck at range 5 this turn (~common), so only one is in range. Their long range stuff is typically -1 attack, and they have base attack 2 on CR2, so a range 6 or 7 attack vs one range 5 attack is about the same. The Automatons don't get to me, but even if they did, they'd likely do ~3 damage.
Round 13: Getting to work on those cannons...
 I can only go southwest with a move 4 and be in range, so I do that. I get a solid hit for 6 in, but they push me back, so I'll have to move in to hit it, and then back out again the next turn. Really want that crude spear.
I forgot (muddle symbol) to show the items I'm refreshing last round, so I refreshed them here.
Round 14: Barely anything happens.
 The Automatons caught up, but I positioned them to be as close to me as they could be this turn (aka legal movement), but as far away from where I would be next turn.
I acted just fast enough to beat the cannons, which is guaranteed with the 17, because I wanted to grant disadvantage if I missed, and wanted shield if the Automatons attacked.
Round 15: Start the wounding on the Automatons.

"A bit" later than I would usually do this (round 2), but the same monster action that I typically have when I do my big attack + wound. Attack 6, pierce 2, into what is normally 2 shields. When they draw the 4 armor (faster than I can go), this is an attack 2 effectively. I did avoid the typical -1 to get the full 3 damage and wound in. Yay!
The Automatons did melt pretty fast once I focused them, but I did want to take down the artillery first if I could and get the wound rolling. Charge situation is relatively good here, 4 and 5. Still just worried about a rolling heal messing things up.
Round 16: Recovery turn.
 Moving tracks back (haven't had to lose this card to a big damage hit, and it's coming in handy here). Timing was weird here, I feel like this is my last two cards? I'm going slow, but not quite slow enough for the best result. Still, only taking one Artillery shot is a nice change of pace.
Also note I didn't play the top heal this cycle, another chance for me to have played it if I was in trouble, I just wasn't. This meant I could make sure I wasn't in trouble with charges.
Round 17: Playing Ping Pong
 Another nice long rest turn. I was unlikely to get hit twice by Automatons, and pretty much impossible to be hit by two Artillery. The Automatons did me a favor and knocked me adjacent to the cannons, which gave the cannon's attack disadvantage.
Finally time for the "move back 2" to hit the sidelines. If I was in worse shape here, with worse movement, I might have kept it, because it would give me something to do while I was going from point A to point B, but I have some good moves left. Less downtime between monsters.
Round 18: One hit on an Artillery
 I move in, they push me back out...
Automatons are happy to watch.
Round 19: Another wound up? Nah
 I got immobilized here, and it is range 6, so both cannons could shoot me and I couldn't shield the immobilize off. I really love the shield.
I could have started another wound rolling on the second Automaton, if they had just been a little faster, but I was satisfied with a big hit into the wounded one and a recovery of a charge.
I didn't do a double attack here (swapping which card was top and bottom), because attack 5 + move back 1, is almost certainly better than attack 4 + attack 3 + wound (an already wounded target), which would net me down two charges, instead of netting me even. Also, less draws for the rolling heal.
I did take 8 damage this round (probably the most of any round so far), but we can fix that with the top heal next round.
Round 20: Should have done this two rounds ago...
 I was really happy with myself for this one. I jumped over the top of the artillery, intending on using it to block me from the Automatons.
The original plan was to leave it alive, but I didn't need to do that once the Automatons beat me, and effectively did nothing. I used my sword and drew +0 exactly kill. Using the jump also costs nothing when I am resting next turn, while making it less likely I take damage on that turn. I also couldn't kill the Artillery, then move on to its loot, because I was two squares away (it pushed me then Immobilized). This was as good as I could do this turn.
I should have done this maneuver (jump over and body block) the last time I did move 3 + shield (round 18), but because the Automatons weren't attacking, I didn't see the need to not be next to them. Until they attacked the next round, sigh. A strong tactical move by me either way, but just a few turns later than would have been ideal.
Round 21: A good time for another rest....
 I'm out of the default range for the Artillery. Automatons need a move +1 or better to interact (out of range of their ranged attack), so this is about as safe a turn as we can imagine.
So, of course they do draw the +1 move (or better) that does the most damage, because it pushes me into the range of the Artillery (and the artillery acted second.
Still, a fine rest, not really in danger. Lost the "fastest" card I have, because I don't need to be fast any longer. I won't take that many more attacks, and I still have some other cards with movement. I am maxed out on the healing track with this, so moving that back is a priority so rolling heals don't knock it off. Get my boots back too, for the next turn =)
Round 22: Boing!
 Artillery, remember when I said I'd save you for last? I lied....
The wounded Automaton finally succumbs as well. The main concern now is how best to collect loot. I don't have my loot boots though, more the pity....
Round 24: Not recorded.
Looks like I missed a picture here, but I just moved over to the chest, and the Automatons trundled closer.
Round 25, 26. Wounding the Automaton -> Resting.
 I advanced the healing track to wound, and the long rest healed me, so I am sitting pretty close to the end of my tracks now, but we're almost done here.
I am actually at max health post-rest...
Round 27-29 Collecting what loot I can


 I didn't "need" any of these actions to win the encounter, but I did pick up a few loot with them. I did make one attack in here, but I could have easily made 3-4 if I needed to. Then the Automaton bled out and I scooped up its loot for flavor reasons.
Final situation
 I had two more cards to play, then a rest into one action on 3 cards, then a rest into one action on two cards, then another rest, so I had 3 more attacks if I needed them, and plenty of movement certainly. I would not call this as close a victory as some of the other ones (scenario 16...), but it was perhaps the most satisfying. It looked impossible, it was impossible (at the insane difficulty I was attempting (+1)), and I made it work relatively well on -1 difficulty.
As much as this worked, does this mean it would have worked on +0 with the same everything? Well, everything does one more damage a round, which translates into me being at 0 hit points (dead) on round 10 instead of at 14 (4 from max). Also, it's much less likely that I can long rest when I'm low, and just getting lower from the artillery being a real threat (attack 3, vs attack 2, often with -1). I think this would be a solid attempt at +0, maybe one of my best attempts, but still likely a loss.
The lower the damage input, the more the drifter can just grind forever. If you can't force them to lose a card, they will eventually just heal back up to full, especially if you bring the "move back 2" top (and don't have to lose it before your first rest, like most of my +1 attempts). Drifter heals/mitigates 20 per rest cycle, which is almost more health than they have. If they are taking less than that, they can just be patient, and things will work out. If they are taking that much, or even a little more.... yikes. The Artillery are dealing something like 6 damage a round just on their own (~30 damage per rest) at +0, and "only" 4 damage a round (20 per rest) on -1. (Unless you kill one early, which I did)
Aside: Seems like I did not use my 3rd small item... Trust me it's good =) I just got to long rest enough I didn't need it I suppose!
I'm not sure how I thought +1 was a good difficulty for True Solo. I think +0 is a serious accomplishment, and I'll probably stick to that going forward =)
I planned to not really be in range of anything, so I went super slow, recovered some charges, and hoped the Automatons would be stuck in the corner forever if they moved before me (which does look quite likely right now, but just wait....) If I had been pushed in range of a Machine, I'd have punched instead of doing the double move back, but I did not "waste" the attack 4 on the Automatons, when I could recover two full charges (with experience! (Experience doesn't matter in this scenario))
Round 4: Cut Off
It didn't matter if the machines moved two or three here. If they moved three I got to attack them. If they moved two, I got to drop the terrain inside the "lane", so I wouldn't have to stand in the center to "double block" it. They likely had several more +1s than +0's in their deck at this point. Move 3 was probably "better" for me. And no, dropping the terrain on the monster does not do damage (they have to enter the hex, the hex entering them doesn't trigger it, ha!), and if you put the hazard on them, they happily keep moving towards the loss condition, so at a certain point, it becomes too late to stop them.
I attacked the Machine NOT stuck in the "lane", which is critical, but not terribly difficult to figure out.
I drew my one immobilize card in my attack deck, which made the next turn very easy. But even if I had not drawn that, I think I would have been fine. Simply go fast, hit the one that was not "stuck" (before they can move) and the "stuck" machine would go backwards. Ideally after I wounded them or something.
I did go as slow as possible, because whatever the machines did, I was ~safe. I did want to land a hit on them if I could (and not the other way around). I have had them double explode in this situation, but that is kind of a good news/bad news result. On +1, you take 3 + 3 + 6 + 6 = 18 on average, and then the Artillery shoot you.
The cherry on top here was that the Automatons got "stuck" on each other. Which is brilliant until you realize they acted AFTER me, so they should have gone the other way. Another minor mistake here. Maybe impactful, but it just would have caused me to do the same thing I did a few rounds later.
Round 5: Machines under control
We do see a bit of tracking wonkiness in R5 for the Automaton health, bit it is corrected in R6. The muddle symbol is my way I note I messed something up =)
Round 6: Automatons don't trigger the auto-loss...
I drew a +3 as well, which instantly killed the second Machine (between this and its self-damage). Lucky again, but I didn't really need that luck here. I can make a 2nd attack into the Machine the next round and all it costs me is some irrelevant top right Artillery damage.
Additionally, it appears that even though I was at full health and full charges of persistent abilities, I used the heal portion of my level 4 card (it is optional). I also did NOT use the move back 1 portion. I am officially clear of the -2 health problem from earlier, and now I'm owed 2(!) charges. Let it never be said that I only make mistakes in my favor, ha!
Round 7: SHORT Rest
Really, I probably should have just jumped past the machine last turn, which would have set me up to just rest for this turn, but mistakes happen. I go as fast as I can, which means I can't attack the Ruined Machines. I also have to get to the top wall of the map, so the Steel Automatons go that way. Not a super strong use of resources, but a necessary one.
Round 8: Exploiting monster movement
My hope was that I'd put it on low health, and it'd die on its own (I am doing attack 6 wound for an extra charge), but I drew a crit. The Ruined Machine that was left also could only move one. It muddled me for the next round, but I'm okay with that because the next round is "safe" (I can't straight up lose no matter what the Machines do)
Round 9: Hit and Run
I put a muddled attack into the Automaton, drawing +1 first, and not getting the heal due to the way disadvantage works. Then I just moved away. The Golems couldn't swing due to the -1 move, and I am set up to go fast and plug the hole so the Ruined Machine has to run away again next round.
I'm not sure why I moved as far as I did, that seems like a move 3. I rotated the healing card because I did not use the heal, but it looks like I should have taken an attack 4 that I did not. I am at 15 health, so this is probably irrelevant, but it's a mistake.
We also see me using a stamina potion here, just to guarantee not losing. This is probably the last turn I need to be specifically fast, so let's make it happen. It also gets me to even, so that's something. P.S. Love the new stamina potions, the restriction is great, 1 card is fine. Old stamina potions were too degenerate.
Round 10: No more auto loss
If you are worried about the attack 4 I didn't take from the previous round, it probably wouldn't affect much. I did get immobilized, but took only one damage from 3 shots, whereas at +0 I would have taken 4 damage here. That level really added up to me not being in danger health-wise, which meant I did not need to lose cards to damage.
If I had not gotten lucky with the crit, I'd have done much the same thing here (maybe rested instead), then just chased down the machine and started with the top right Artillery, instead of the bottom left I will go after in a few turns.
Round 11: Come at me Automatons.... Or not, ouch...
Round 12: A good time for a rest.
Round 13: Getting to work on those cannons...
I forgot (muddle symbol) to show the items I'm refreshing last round, so I refreshed them here.
Round 14: Barely anything happens.
I acted just fast enough to beat the cannons, which is guaranteed with the 17, because I wanted to grant disadvantage if I missed, and wanted shield if the Automatons attacked.
Round 15: Start the wounding on the Automatons.
"A bit" later than I would usually do this (round 2), but the same monster action that I typically have when I do my big attack + wound. Attack 6, pierce 2, into what is normally 2 shields. When they draw the 4 armor (faster than I can go), this is an attack 2 effectively. I did avoid the typical -1 to get the full 3 damage and wound in. Yay!
The Automatons did melt pretty fast once I focused them, but I did want to take down the artillery first if I could and get the wound rolling. Charge situation is relatively good here, 4 and 5. Still just worried about a rolling heal messing things up.
Round 16: Recovery turn.
Also note I didn't play the top heal this cycle, another chance for me to have played it if I was in trouble, I just wasn't. This meant I could make sure I wasn't in trouble with charges.
Finally time for the "move back 2" to hit the sidelines. If I was in worse shape here, with worse movement, I might have kept it, because it would give me something to do while I was going from point A to point B, but I have some good moves left. Less downtime between monsters.
Round 18: One hit on an Artillery
Automatons are happy to watch.
Round 19: Another wound up? Nah
I could have started another wound rolling on the second Automaton, if they had just been a little faster, but I was satisfied with a big hit into the wounded one and a recovery of a charge.
I didn't do a double attack here (swapping which card was top and bottom), because attack 5 + move back 1, is almost certainly better than attack 4 + attack 3 + wound (an already wounded target), which would net me down two charges, instead of netting me even. Also, less draws for the rolling heal.
I did take 8 damage this round (probably the most of any round so far), but we can fix that with the top heal next round.
Round 20: Should have done this two rounds ago...
I should have done this maneuver (jump over and body block) the last time I did move 3 + shield (round 18), but because the Automatons weren't attacking, I didn't see the need to not be next to them. Until they attacked the next round, sigh. A strong tactical move by me either way, but just a few turns later than would have been ideal.
Round 21: A good time for another rest....
So, of course they do draw the +1 move (or better) that does the most damage, because it pushes me into the range of the Artillery (and the artillery acted second.
Still, a fine rest, not really in danger. Lost the "fastest" card I have, because I don't need to be fast any longer. I won't take that many more attacks, and I still have some other cards with movement. I am maxed out on the healing track with this, so moving that back is a priority so rolling heals don't knock it off. Get my boots back too, for the next turn =)
Round 22: Boing!
The wounded Automaton finally succumbs as well. The main concern now is how best to collect loot. I don't have my loot boots though, more the pity....
Round 24: Not recorded.
Looks like I missed a picture here, but I just moved over to the chest, and the Automatons trundled closer.
I am actually at max health post-rest...
Round 27-29 Collecting what loot I can
Final situation
As much as this worked, does this mean it would have worked on +0 with the same everything? Well, everything does one more damage a round, which translates into me being at 0 hit points (dead) on round 10 instead of at 14 (4 from max). Also, it's much less likely that I can long rest when I'm low, and just getting lower from the artillery being a real threat (attack 3, vs attack 2, often with -1). I think this would be a solid attempt at +0, maybe one of my best attempts, but still likely a loss.
The lower the damage input, the more the drifter can just grind forever. If you can't force them to lose a card, they will eventually just heal back up to full, especially if you bring the "move back 2" top (and don't have to lose it before your first rest, like most of my +1 attempts). Drifter heals/mitigates 20 per rest cycle, which is almost more health than they have. If they are taking less than that, they can just be patient, and things will work out. If they are taking that much, or even a little more.... yikes. The Artillery are dealing something like 6 damage a round just on their own (~30 damage per rest) at +0, and "only" 4 damage a round (20 per rest) on -1. (Unless you kill one early, which I did)
Aside: Seems like I did not use my 3rd small item... Trust me it's good =) I just got to long rest enough I didn't need it I suppose!
I'm not sure how I thought +1 was a good difficulty for True Solo. I think +0 is a serious accomplishment, and I'll probably stick to that going forward =)